HOW TO ARRANGE FLOWERS IN VASE: ANOTHER MOTHER’S DAY GIFT GUIDE

Happy Mother’s Day to all the mothers out there! I know I am a day early but tomorrow I will be busy with family. Lets start by saying how much my mom means to me. She is the most strongest and sweetest person in the world. I love her to death! My mom is my best friend. I share all my secrets with her. I remember back in high school I will always talk to her regarding my boyfriend problems and friends issues. Definitely great times. My mom always makes sure me and my brother have everything. She means the world to me. Because of her… I am the person I am today. I love my mom!!!! ❤

Since Mother’s Day is tomorrow, I wanted show you how to arrange flowers. Okay, after you have chosen what flowers and vase you want to use, the next step is to arrange the stems. I bought all my flowers from Traders Joe. It is super cheap! Anyways, fill your vase with cold water and use floral food. Cut the stems to the size of the vase. You can cut some of the stems a bit longer and a few stems a couple inches shorter. As you arrange, this will help you create grouping that appears to be more full and rounded. Before putting any flowers into the vase, strip the stems of all leaves that will be under the water. Removing the leaves from the stems will help the water last longer.

Criss-cross the stems so they will help support each other. Remember to vary your blooms, but keep the longest stems in the middle of your arrangement. The shortest stems should remain towards the rim of the vase. There you have it! Now you got yourself an arrangement that is half the price. Remember to change the water frequently to stop the growth of bacteria and prevent your water from turning green. By following these simple steps, you will be able to create a beautiful floral arrangement for mother’s day, your home, or to even surprise a loved one for the next occasion. I hope these tips will help your arrangements! Have a great mother’s day weekend and I will talk to you soon.

DIY MUG DESIGNS {MOTHER’S DAY GIFT GUIDE}

Mother’s day is in four days and I am sure most of us are last minute people who have no idea what to get the moms. I know it is easy to just go out and buy flowers and a card… But there is more meaning when something is handmade. I think today’s society we forget what is important. It is not all about how much you spent or what brand it is. It’s about the thought that counts!
I am a Mother myself and also a HUGE coffee/tea drinker. Yes… It’s that bad! Well, today’s tutorial I will be showing you how to makeover a simple mug. Perfect for the moms out there who loves drinking coffee or tea. Mental note for any of the dads who are reading this: if you have younger children, you can actually help them make this as well. Get crafty with your kids! It is fun to get a little creative and show the mommies out there how much they mean to you!

Elements needed:
Plain white mug or tea cup
Sharpie Metallic paint pen in gold – they come in different colors as well. I got mine at Home Depot in the paint section.
Instructions: Draw the design onto the mug/tea cup. You can draw a heart or write memos on it. Allow for the paint to set for 24 hours. Once it has set, bake it for 30 minutes at 350 degrees.
Easy right? Now you wrap it up in a box and add in a box of mom’s favorite tea or coffee. You can also make this for any occasion. The oil-based paint turns permanent after you bake it. You can actually use the pens on anything like plates, vases, and etc. I hope you all enjoy this tutorial! Let me know what other crafty ideas you want me to make. Have a great day!
PERSONALIZED EASTER BASKETS FOR KIDS
Easter is this weekend and I have some great Easter basket ideas I would like to share with you. I know it is easy to go buy a pre-made Easter basket but what is fun about that? This is a chance for you to come up with fun, creative ways to put together a basket. Also the perfect part about this is showing the kids that you were extra thoughtful this year by giving them gifts specific to their personalities.


Here is a list of items you can add in the Easter basket:
Stickers, candies, small toys, stuffed animals, crackers, coloring books, crayons, sippy cups, puzzles, fun pencils, sunglasses, side-walk chalk, hair bows, books, jewelry, sports ball, and jump ropes.
You can also do themed Easter baskets, so if you wanted to do a garden kit basket, it could be filled with gardening gloves, shovels and flower seeds. And if you like to do a bath kit basket, it could be filled with bubble baths, a bath towel, bath crayons, and little bath toys. You get the point. The ideas are endless… Here is what I created for my kids and my cousins kids for this weekend. We are having a crawfish party at the house and yummy desserts, so I am definitely excited. I will definitely post pictures for you to see. I hope you have a wonderful holiday!

DIAPER CAKE TUTORIAL
Are you hosting a baby shower or attending one any time soon? I have a project that you can create that will not take too much time to put together and yet, will have the mother-to-be greatly appreciated. It seems to me that it is another baby boomer year. So I know with all these babies, there bounds to be baby showers. I know we can go the old fashion way and purchase gifts straight from the gift registry but this is actually a time where I can get creative with the gifts I give out. When there is a chance for me to get creative, I will absolutely do so. There are plenty of websites out there that you can pay for them to create one but why not do it yourself for half the price. I made a diaper cake for my cousin about a year ago and I will include step by step instructions for you to learn how to make your very own diaper cake. Whether it is for a gift or the center piece at a baby shower, I got it here for you.

Supplies you will need: 1. White disposable diapers, in size of your preference, depending on the size of your cake. 2. Wide Ribbons (1 1/2 to 2 inches) 3. Hot glue gun 4. Paper crinkle to match the ribbon 5. Big size letters (baby name) 6. Cardboard tube (Paper Towel Roll)
Optional: Cake accessories/toppers – it can range from a teddy bear or to several smaller objects placed around the cake such as socks, onesies, diaper cream, rattle, bibs, blankets, burp cloths… the possibilities are endless.
Step 1: Making the Layers – I started with the bottom layer first. I placed the diaper overlapping each other. I will continue this patter so that only the smooth edges of the diapers are showing until they are fanned out evenly around. Most people used a rubber band but I did not want to do that because I did not want to indent the diapers. It is all up to you, I think my process took a little bit longer but if you have an awesome husband who can give you a hand, it is definitely possible. Step 2: When all the layers get to your desired size go ahead and tie the ribbon to secure the diapers and set aside. Step 3: Once all the layers are completed, I insert the cardboard tube into the bottom layer and then stacked the remaining layers on top by sticking the tube through the middle of each layer. (You can also use a wooden dowel as well) Step 4: This is when you will add the accessories to the diaper cake. For the diaper cake I made, I stuffed the teddy bear on the top of the cake where the teddy bear is peaking out. After that I stuffed the paper crinkle in each of the layer. Last, I glued the baby’s name on the ribbon to make it more personal.
This is optional but you can wrap the diaper cake with clear wrapping paper if you like.

I was looking around Pinterest and there are other designs you can make for diaper cakes. It is actually neat how people come up with different creativeness. There you have it! A diaper cake you can make for a friend, sister, or cousin…
LEGO THEMED BIRTHDAY PARTY
Are you ready to learn how to create an awesome LEGO party? Here is another inside scoop of my party creations. My son, Cohen, turned one about eight months ago and I knew Lego was the perfect theme for him. With the help of Pinterest, I can definitely gather lots of ideas and inspiration to make this party possible. Look at the birthday boy:
The #1 I made with all of his baby pictures.

These were the favors I gave out to all the kids. It was crayons molded into little LEGO man. You can find the mold at your local LEGO store. I melted the crayons using old cans that I saved as a double boiler and then pour it into the mold. And there you have it, LEGO man crayons.

The favor bags. I used card stock to punch out the circles and glued them on the gift baskets to make it look like LEGO blocks.


The boys and girls favor bags. Each have stickers, a pack of LEGO, pop rocks, LEGO man crayons, LEGO block erasers, and more candies.


Photo booth area.


I always go all out on the dessert table.


Little man’s birthday cakes.


Sweets.

Cake push ups.
LEGO man sugar cookies, rice krispies pops, and home-made cupcakes.


TUTU TUTORIAL
During this time of the year, I love to take the kids out for their yearly photos. Whether it is indoor or outdoor pictures, our household just loves to take tons of pictures for that precious memory keepsake. Now any time we take pictures, I love to dress my daughter up in a cute tutu. I had heard these tutus were very easy to make and I thought I would give it a try. Boy… Were they correct! I love anything crafty that does not require too much work. I guess you can say it is like a fun version of knitting. Not only are the tutus great for pictures but definitely for other occasions. Here is the one I made for my daughter. You can scrunch the tulle together for a really full tutu if you like.

Here is what you will need:
A spool of tulle – I bought about 20 yards of tulle. You can find tulle at any craft store; I got mine at Joann’s.
Elastic – 1/2” or larger
Needle & Thread
Scissors
Ribbons (optional)
Here are the steps:
1. Measure waist. Make sure you measure the child and then take off about 2 inches of elastic. The reason for this is because as you put on the tulle and tighten it, it will stretch the elastic out and make it bigger. Trust me; I learned my lesson the first time I made it for my daughter.
2. You then sew the elastic together by hand or machine.
3. Next, find something to hold the elastic while you tie on the tulle. I used a roll of paper towel; just make sure you do not stretch the elastic too much.
4. Now it is time to measure and cut the tulle. Decide how long you want your tutu to be. What I did was measure my daughter from the waist to just above her knees and then I double that number. A good general rule of thumb for a toddler will be about 24 inches, so by the time you fold it in half it will be 12 inches in length. You do not have to be precise because you can do all the trimming at the end.
5. Fold a strip in half with the ends even, so where it forms a loop. Pass the folded end under the waist band then slip the cut ends through the loop and tighten the slip knot around the elastic. Make sure not to pull it too tight.
6. Continue the process until you complete the entire waistband. And there you have a finished tutu!
7. I like to add props to my tutu. So this step will be where I will pick a pretty ribbon and tie a bow onto the tutu.


That is it! You can now wrap your little princess in the tutu you just made for her. I also made my daughter a very cute tutu dress for Halloween. I will definitely post it up with instructions on how to make it when October is closer.
CHRISTMAS THEMED BAPTISM
Happy Friday! Today I would like to share another party or event that I created. We had our son baptized when he was about 3 months old. After the Baptism, we had a celebration at the house. Any time we have a party, I am the kind of person that will try to incorporate a theme and have a dessert table. Well since my son’s Baptism was right around the corner from Christmas, I thought I would incorporate a Christmas themed Baptism. I mean since the decorations was going to go up one way or the other, why not put it to use for a Baptism event.
I planned for a warm tone color theme, so I used brown and white. Now for the food, it was all made by my mother. She is the most awesome cook in the world. Literally! I have to say, we are very blessed to have her. And for the desserts and decorations, it was all made by me. It is always great to have family together to celebrate an occasion like this.


CIRCUS THEMED BIRTHDAY PARTY
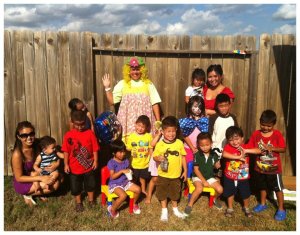
Hello Everyone! Today’s post will be dedicated to all you party planners out there. I put this birthday party together for my daughter’s 3rd birthday two years ago. It was a Big Top Circus Carnival party. It took me several months to plan and make all the decorations. It was a lot of work but yet so much fun. We served hot dogs, snow cones, nachos, chips, lemonade and TONS of sweets. We also had Groovy the Clown who did face painting and fun games with awesome prizes.
It was one heck of a day! I was eight months pregnant with my second child. I was on my feet all day and hosting on an empty stomach, but towards the end of the day, my 3-year-old ran up to me, gave me a hug and said, ‘Mommy, I love you. Thank you for my party’. Those words were enough to make me full. Definitely worth going through all that trouble to celebrate the day my baby was born.
Come one, Come all
To the Greatest Show on Earth
Welcome to Chloe’s Circus Carnival of fun…


These are all the items I put together myself with the assistance of The Mr., who was definitely a big help throughout the party.


I made this guest book so guest can line up to have their Polaroid photo taken. They will then tape it on the guest book and write a little message for the birthday girl, but unfortunately, the Polaroid that I purchased wasn’t working. So I ended up using it as her photo album.
The colorful centerpieces I made for the tables.
I inflated colorful beach balls and set them inside the moonwalk.

Our yummy desserts… I had cotton candy bags, gummy worms, Pixi Stix, cupcakes and caramel apples that I made.

We served hot dogs, nachos, chips, snow cones and lemonade.


Here is the birthday girl with Groovy the Clown.
It was time to sing ‘Happy Birthday’!
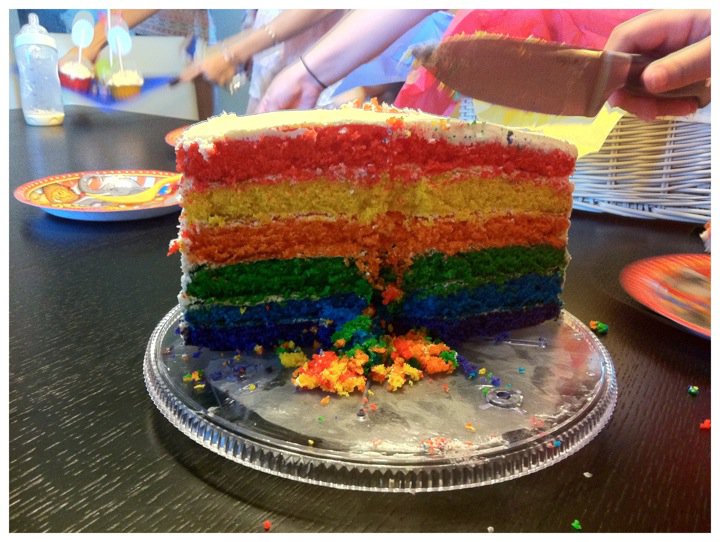
And here is the rainbow cake that I made…